TekkotsuMon Tutorial
TekkotsuMon is
the collection of tools which provide control and
visualization/monitoring of the robot's run time state. There are
three levels to the interface: local/physical, console, and GUI.
You can read more about the UI philosophy in the ControlBase
documentation. (ControlBase
is the base class for all of the menu items you will see below.)
Available controls:
Click here
to see a list of the controls available by default at run time.
Level 1: Physical Access
With the Aibo series of robots, you need nothing more than the robot itself to interact with the control system. Any time the emergency stop is activated (look for the pulsing tail LEDs) you will be able to access the Controller through the head buttons on an ERS-210, or the tail buttons on an ERS-220. Robots which lack any direct human interface are unfortunately unable to use this level of the system.
| ERS-210: | ERS-220: | ERS-7: | |
|---|---|---|---|
| Next Item: | Front Head Button | Left Tail Button | Front Back Button |
| Previous Item: | Rear Head Button | Right Tail Button | Rear Back Button |
| Select Item: | Chin Button | Center Tail Button | Center Back Button |
| Cancel ("Return"): | Back Button | Main Back Button | Head Button |
| Request Text Input Prompt: | Press "Next" and "Previous" buttons at the same time. | ||
The Aibo's system console has a limitation that when input is being
read, all execution in that process halts until the read has
completed. Thus, you need to request a prompt when you wish to
enter data on the system
console. The Tekkotsu console (see below) does not have
this limitation, and thus will ignore "Text Input Prompt" requests if
the Tekkotsu console is connected.
Feedback is provided through sound
and the LEDs. The 210 will display a "number",
whereas you can simply count the number of LEDs on the heads of the 220
and 7.
Level 2: Console
For development, a console is
indispensable - debugging would be near impossible without it. Of
course, this requires a computer, wireless ethernet hardware, and implies physical separation from
the robot, which is why it's important to allow users to do basic
operations in Level 1 without all of those requirements. At this point, note that a stand to elevate from the ground can be very useful in development to prevent
unexpected (and costly) motions which could cause a robot to fall off of the table.
There are several different consoles, each accessible by telneting to a different port.
- System console - direct terminal console (or port 59000 on Aibo)
- All output from system calls, printf, cout, and cerr goes here.
- Output from sout (below) will be redirected here if it is not connected.
- Output is non-blocking, so if a crash occurs, the last few lines of output may not be displayed.
- Reading from this console (cin) is blocking - your code
will freeze until the user hits return, and there is no way (that we
know) to check if input is waiting. (hence the need for the user to
specify when they are ready to input data using the buttons listed
above)
- Tekkotsu standard out (sout)-
port 10001
- If you connect to this port, all tekkotsu-generated output will be sent here instead of the system console. This can help you separate framework messages from system messages, or your own debugging messages. (if you are using cout)
- Output from serr
is sent here if there is no other connection.
- Output is non-blocking.
- Input from this port is sent to the controller. If
there is a GUI active, anything you type will be broadcast as a TextMsgEvent.
If there is no GUI active, the input will be processed by the
controller (commands listed below). This behavior can be modified via tekkotsu.cfg
- Tekkotsu standard error (serr) - port 10002
- Output is blocking. Thus, if you send something here, your code will stop until the message is sent. This is very handy for debugging so you can tell what it was doing right before a crash, but is also rather slow, so it should be used sparingly.
- NOTE: It appears this is not completely blocking.
There appears to be some system buffering, so that a few lines of
output may still be lost.
- If this port is unconnected, it will be redirected to sout, but then no claims about blocking can be made (sout is responsible for its transmission).
- There is no input from this port.
When sout is
being used as the main display for the Controller, (i.e. when there is
no open GUI) the following commands are available: (from the Controller
documentation)
- '!refresh' - redisplays the current control (handy on first connecting, or when other output has scrolled it off the screen)
- '!reset' - return to the root control
- '!next' - calls doNextItem() of the current control
- '!prev' - calls doPrevItem() of the current control
- '!select' - calls doSelect() of the current control
- '!cancel' - calls doCancel() of the current control
- '!msg text' - broadcasts text as a TextMsgEvent
- '!root text' - calls takeInput(text) on the root control
- '!hello' -
responds with 'hello\ncount\n' where count is the number of
times '!hello' has been
sent. Good for detecting first connection after boot vs. a
reconnect.
- '!hilight [n1 [n2 [...]]]' - hilights zero, one, or more items in the menu
- '!input text' - calls takeInput(text) on the currently hilighted control(s)
- '!set section.key = value' - will be sent to Config::setValue(section,key,value)
- any text not beginning with ! - sent to takeInput() of the current control
By default, most controls provide a menu interface. Typing the number of an item or a unique prefix will select it.
Level 3: GUI
To ensure platform portability, we have written our GUI tools using Java, and have some legacy code through MATLAB which may be of interest
Both the MATLAB and Java versions share network code. Each network connection to the Aibo is maintained by a Java object, which is then either used by a MATLAB interface or a Java interface. In this way, there is no code duplication.
Available Java tools are listed below.
Java Tools
Setting up TekkotsuMon
To use the Java tools, you will need Sun's Java Software Development Kit 1.4 or higher. The machine you are running on needs to be able to access the Aibo's IP address. Beware firewalls at NAT issues!
If you had Java when you compiled the framework, make should have already built the tools. Change directory to
<tekkotsu-root>/tools/mon
Type make now if
the
tools
are not already built. (look for .class files in org/tekkotsu/mon subdirectory).
To launch the main GUI, type:
./ControllerGUI <aibo-ip-address>
This should bring up the ControllerGUI window similar to the one shown in the next screenshot.
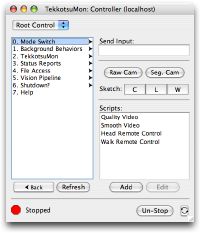 The
Controller
The
Controller

The Controller is the main interface to edit the robot's run time state. It provides all of the capabilities of the console - messages typed in its input field are interpreted exactly as they are on the console.
Double clicking menu items will open them. Items with
arrowheads on the right signify submenus. The menu system
contains a number of useful tools for editing parameters and producing
various status reports and logs.
The chasing arrows in the lower right will force a reconnect -
this is handy if the robot is forceably rebooted and the Controller doesn't notice
immediately.
The protocol used in communication with the ControllerGUI is
defined in Controller's
documentation. This same protocol can be used manually to send
commands to port 10001 if the GUI isn't connected.
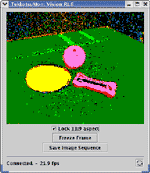
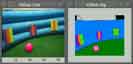
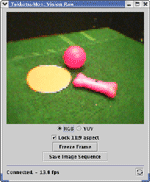 Vision
Monitor
Vision
Monitor
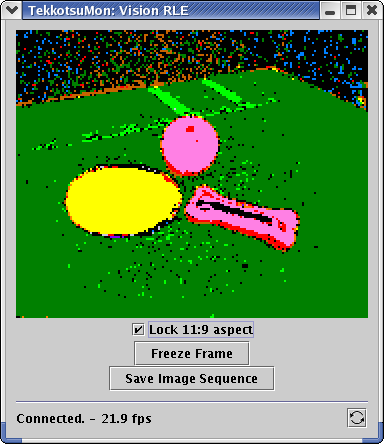
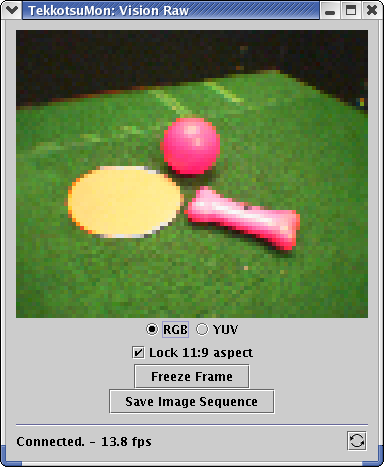
You can stream video from the robot in real time and monitor
the
performance of the color segmentation. You can also record these
streams to image sequences on the desktop for later processing.
The Raw Vision window also lets you select what color space to
view.
The network tends to be the main bottleneck - the FPS is
relative to frames received by the GUI, not necessarily the FPS the robot is
processing on its end.
You can modify compression, resolution, and channel options
from the tekkotsu.cfg
file (<project>/ms/config/tekkotsu.cfg)
However, you can also change these options at run time using the !set command (see example here)
 Watchable Memory
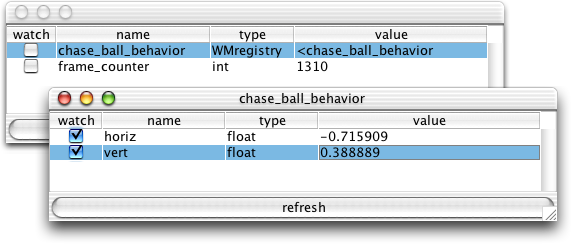
Using a bit of C++ overloading, we can monitor all changes to
primitive
data types without changes to existing code. You can then see the
current, real-time values of relevant variables in a window as shown
here, or have other sections of code listen for value changed events so
they can update themselves as well. Note in the screen shot the
recursive structure of embedded registries to keep related variables
together. Custom GUIs can be created to visualize more complex
data types.
Unfortunately, the screen shot isn't nearly as exciting as the
real thing, since the whole point is that the values automatically
update. To demo this, the ChaseBallBehavior (under the Mode
Switch menu) features two variables that store the last known veritcal
and horizontal position of the ball. Launch the ChaseBallBehavior
and then launch "View WMVars" under the TekkotsuMon menu. (you may need
to press "refresh" within the WMVar Viewer to see new variables)
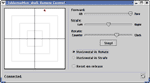 Walk
Remote
Control
Walk
Remote
Control

This interface allows you to walk the Aibo around, and is overloaded to
drive a wheeled robot as well - combined
with the vision monitors, it's everything you need for basic
telepresence. Using the right mouse button in the drag area will
temporarily reverse the Rotate/Strafe setting.
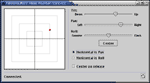 Head
Point Remote Control
Head
Point Remote Control
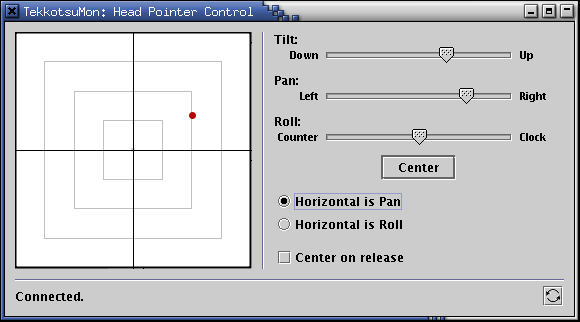
This interface allows you to control the Aibo's head. It
is very similar to the interface used for the Walk GUI.
Future version may include additional HeadPointerMC
features.
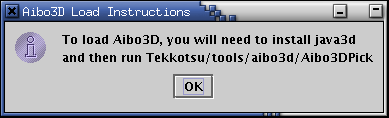
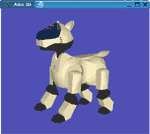 Aibo3D
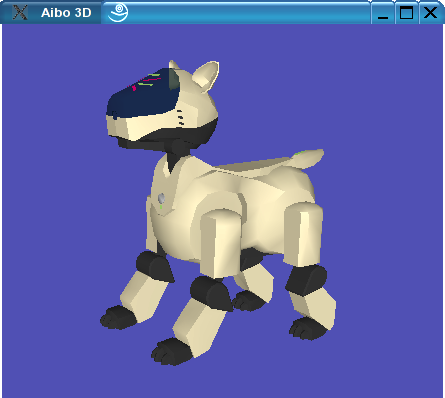
Using 3D models released by Sony, we have build a tool which
will allow you to visualize the Aibo's current posture, or grab joints
and move them around in 3D.
This tool requires java3D to be
installed. (Available for Linux and Windows)
 Emergency
Stop Control
Emergency
Stop Control

This
interface allows you to turn the emergency stop on/off
remotely. This tool is also embedded in the Controller
GUI, in the lower left hand
corner.
By alt-clicking the button in ControllerGUI, a full sized window can
be brought up and made any size you please.
No roboticist should be without a big red panic button! ;)
Error Messages
 This very simple class
allows code
from the robot to
bring
messages up on
the screen. In the future, anything sent to serr (port 10002) will be
brought up in a console similar to this to further streamline
displaying important
messages.
This very simple class
allows code
from the robot to
bring
messages up on
the screen. In the future, anything sent to serr (port 10002) will be
brought up in a console similar to this to further streamline
displaying important
messages.
MATLAB Tools
 Setting
up
TekkotsuMon - MATLAB
Setting
up
TekkotsuMon - MATLAB
NOTE: The MATLAB tools are currently
broken in version 1.5. There is a work around: copy all of the *Listener.java files from tools/mon/org/tekkotsu/mon/ to tools/mon (with the MATLAB .m files)
In order to use TekkotsuMon, you need a reasonably fast computer running Matlab 6.5 or higher. If you want to modify or recompile the network communication classes (written in Java), Change directory to
tekkotsu_root/tools/mon
Edit config.m to specify the Aibo's IP address (conf.ip). Start Matlab, and at the prompt type
run
It is important to launch MATLAB from within the tools/mon
directory so that it can find related support files. On Windows,
you will need to make a shortcut to MATLAB and set the work path
("Start in:") to this directory (via right click -> Properties).
This should bring up a control window with buttons for various
TekkotsuMon components found such as Raw Vision, Segmented Vision,
Joint monitor, etc. Start the Aibo with Tekkotsu (wait for it to boot),
and click on any button to start that component.
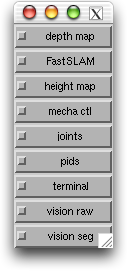
MATLAB Stuff - Currently Broken

Mecha
Control
An earlier MATLAB prototype for the Java WalkGUI.
However, this interface has easily customizable buttons, which are
currently set up to play sounds. (To play sounds in the Java
tools, use the Controller to open the File Access -> Play Sound
menu, which will show a listing of all available sounds.)
Joint Graphs
 These graphs show the
position (blue)
and force
(red) on each
of the joints. This graph was taken during a run of the
FollowHeadBehavior - look at the neck joints to see the different
directions that the head was pointed in.
These graphs show the
position (blue)
and force
(red) on each
of the joints. This graph was taken during a run of the
FollowHeadBehavior - look at the neck joints to see the different
directions that the head was pointed in.
A similar graph is available for PID settings.
 Vision
Monitors
Vision
Monitors

Similar to the Java tools, this should help you quickly get
prototype MATLAB code for processing image data.