Execution and Runtime Configuration
The Tekkotsu framework allows your behaviors to run on a desktop computer as well as onboard an embedded device. Flexibility in runtime environment is important to allow a variety of usage cases:
- Test new code in simulation before you run it on real hardware
- See Mirage
- Faster development cycle
- Save wear and tear
- Control over time:
- Run faster than real-time to zip through test sets (e.g. LoggedDataDriver)
- Run in slow motion to analyze complicated actions
- Pause time to explore internal state
- Debug existing code with tools like gdb
- Better information, can view internal state, fix bugs faster
- Run on recorded data sets -- complete reproducibility
- Improve performance using profiling tools
- Tool
Development:
- Link against the framework library to use pieces of framework code in tools or unit tests
Building:
The downloads page should provide links to specialized instructions for your platform. But to summarize:- You can copy the Tekkotsu/project directory to make multiple independent “projects”. (You can change the name of the directory for each copy, but do not remove the original project directory.)
- Run make in your project directory to build the default robot target listed in project/Environment.conf
- Run make tekkotsu-MODEL to build for a specific model
- Don’t forget to add the -jN argument for make to build on N processor cores in parallel—great speedup!
- Mac OS X users can also use Xcode, either as a ‘native’ Xcode build process, or have Xcode build using make (see Xcode setup).
Execution
The Tekkotsu executable will be named make tekkotsu-MODEL, where MODEL is the name of the target robot. It will be placed directly in your project directory. To run it:
You can launch Tekkotsu without any command line arguments. Passing --help will give you a list of the available options, such as overriding runtime configuration values or causing startup to be interrupted at various stages of initialization in order to debug startup problems.
Once Tekkotsu is running, you can type help to get a list of commands and their syntax. Some commands, like set, can also give descriptions of their arguments, e.g. help set Vision.Sources would give more information on the Vision.Sources parameter. Commands available for 3.1 release include:
- advance [camera|sensors|all]* - Sends the next frame for the specified queue(s) in their listed order (can be listed more than once).
Disregards timestamp information, and doesn't advance time, unlike 'step' command. No arguments and "all" is the same as "sensors camera". - delete name - Remove an entry from the CommPort or Drivers list
- freeze [camera|sensors|all]* - Equivalent to 'set queue.Frozen=true'.
Stops sending frames from the specified queue(s), but still allows time to move (unlike 'pause'). No arguments is the same as "all". See 'advance' and 'unfreeze' - get_time - Displays the simulator time.
- load [file] - Load HAL configuration from file; if file unspecified, uses the last specified file ('hal-$MODEL.plist' by default).
Note that these files are human-readable XML (with comments!), and you can remove values to specify only a subset of settings. - new type [name] - Creates a new driver or communication port instance.
Driver types are: Camera Create Dynamixel ImageStream LoggedData SSC32 TeRK
Communication ports types are: ExecutableCommPort FileSystemCommPort NetworkCommPort RedirectionCommPort SerialCommPort - pause - Equivalent to 'set Speed=0'. Can be abbreviated 'p'. Stops the flow of time within the simulator.
- reset [camera|sensors|all] - Moves the specified data queue(s) back to the first entry in their list.
- run - Resets speed to last non-zero value (i.e. value prior to last 'pause'), can override by passing a new value as argument. Can be abbreviated 'r'.
- runfor time - Triggers 'run' until the simulator time has moved by the specified number of milliseconds, then pauses.
- runlevel [0|CREATED | 1|CONSTRUCTING | 2|STARTING | 3|RUNNING | 4|STOPPING | 5|DESTRUCTING | 6|DESTRUCTED] - You can specify a runlevel to move to, or if unspecified, the next one.
You can only move forward runlevels, not backward. Usually you'll only need RUNNING, unless you are debugging startup/shutdown code or Tekkotsu itself. - runto time - Triggers 'run' until the simulator time reaches the specified value and then pauses
- save [file] - Save HAL configuration to file; if file unspecified, uses the last specified file ('hal-$MODEL.plist' by default).
Note that these files are human-readable XML (with comments!), and you can remove values to specify only a subset of settings. - set [var=value] - Sets HAL configuration variables. Without any arguments, displays all available variables and their current values.
Type 'help set <variable>' to get more information about a particular variable. (Configuration variables are covered in more depth in the next section) - status [Main|Motion|SoundPlay|Simulator|all]* - Displays a status report regarding current time, upcoming keyframes, and semaphore usage. Specify one or more processes to get more in-depth, per-process status reports.
- step [camera|sensor|timer|motion] - Runs at "full" speed until the next indicated time frame, or the next available frame if no type is specified.
See 'status' for available frames. - unfreeze [camera|sensors|all]* - Equivalent to 'set queue.Frozen=false'.
Begin sending frames from the specified queue(s) again. Timestamps for the file listing are offset by the time spent frozen minus frames advanced so the queue(s) will continue from their current position. No arguments is the same as "all".
Once the RUNNING runlevel is reached, the StartupBehavior of the current project is called, and the framework is fully operational. You should be able to connect a ControllerGUI and launch behaviors, inspect values, etc. However, you may notice that there are no camera images or sensor updates being processed. To connect to your harware devices, you will need to configure the HAL as described in the next section.
Configuration
There are a number of configuration settings to control the passage of time and the input of vision and sensor data. These settings are loaded from hal-modelname.plist file in the project directory if it exists, and are otherwise given default values from defaults/hal-modelname.plist. These values can be overridden by command line arguments given when launching Tekkotsu, or by the set command at the HAL command prompt.
The DeviceDriver class provides the interface to a piece of hardware. DeviceDrivers often connect to their hardware via a CommPort interface. Your robot's default configuration should have already instantiated the appropriate drivers and ports for your model, although you may need to fill in host names or other such parameters. You can type 'set Drivers' or 'set CommPorts' to see the current settings.
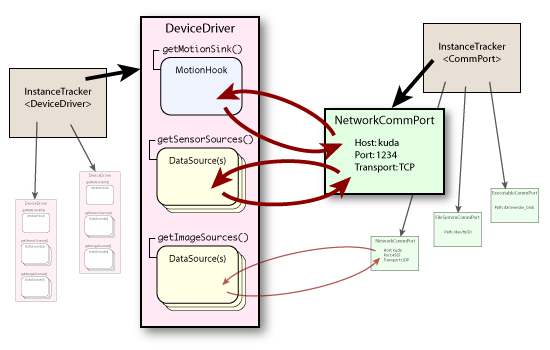
You can create new drivers and comm ports with the 'new' command, and delete them with 'delete'. (see command list in previous section)
The HAL runs two threads for loading data, Vision and Sensors, which can each be connected to one of the DataSources via their Sources list. Typing 'help set Vision.Sources' should display a list of all available image sources. Similarly, 'help set Sensors.Sources' will show sensor sources.
Once you have the threads connected to DataSources, and the DataSources configured to connect to their hardware, your behaviors should start seeing the data flow into the Main and Motion processes.
There are two fundamental modes for handling data. In realtime mode the simulator time will be linked to the hardware clock, and data may be dropped if too much processing is being done on each frame. In non-realtime mode, the simulator waits until processing is complete on each data chunk before advancing the "time" to the next input. Non-realtime mode only really makes sense when using something like logged data on disk. If your data source is itself realtime, you're not going to go any faster than its sampling frequency, and will still drop data if you're too slow.
In realtime mode, you can scale the clock via the Speed parameter. For instance, you can set Speed=0.5 so that time moves at half speed. This can help you to artificially constrain or boost the host system's computational power as if the code was running on a more or less powerful platform.
Other notable settings include:
- Speed (float, default 1)
The speed at which to run the simulation, as a multiple of "real-time". 1 is normal, 0.5 is half-speed, 0 is paused, and any negative value requests full-speed mode, where the clock is moved as fast as processing (or manual control) allows..
- InitialRunlevel
(enumeration, default RUNNING)
Specifies how far startup should proceed before pausing for user interaction. This value only affects startup, and setting this value from the simulator command prompt will have no effect. (Use the 'runlevel' command instead.)
- WaitForSensors (bool, default false)
If true, wait for initial sensor readings before triggering the startup behavior or starting the motion polling thread. On some platforms, sensed output values can be used to initialize output positions. On others, you may be unable to get any feedback, or can only expect feedback if the robot was left running and the executable is reconnecting. - Motion
- FeedbackDelay (int, default 0)
Delay (in milliseconds) to apply to motion output before feeding back to sensor values (simulates (very roughly) inertia and system response time); 0 indicates instantaneous/perfect joint control, negative values indicate no feedback (only sensor data sets joint positions) - OverrideSensors (bool, default false)
Allows motion feedback to override position values from sensor data loaded from disk. If false, feedback is only provided when no other sensor data is being provided - Verbose (int, default 1)
Report whenever motion commands are being processed or joints are updated.
0 - nothing, 1 - errors, 2 - warnings (e.g. dropped frames), 3 - notification every frame
- FeedbackDelay (int, default 0)
- Vision and Sensor
The following values are common to both input modules
- Sources
Defines a list of DeviceDriver instances from which data will be taken. Can be either just the driver name (uses first applicable data source), or 'DriverName.QueueName' in case a driver provides multiple data sources.
Instantiated DeviceDrivers will be listed as entries in the "Drivers" configuration section ('set Drivers' to see the list); see 'new' command to instantiate additional drivers. - Framerate (float,
default 30 for Vision, 31.25 for Sensors)
The rate at which images should be loaded. This is passed as a hint to the source, which may be limited to multiples of its capture device frequency. - Frozen (bool,
default false)
If true, no frames will be sent, except via explicit 'advance' commands; if false, the thread will run and send messages at the requested times automatically. - Heartbeat (bool, default true)
If enabled, an empty "heartbeat" message is sent at the appropriate framerate, even if no data is being processed (i.e. frozen, no data loaded, or out of frames); this will cause an update event within the simulator, repeating processing on the previous data. - Verbose (int, default
0)
Controls how much feedback to give on the console regarding progress:
0 - none
1 - report when message is sent
2 - also report when message is dropped
3 - also report when heartbeat is sent/dropped, and when loop occurs
4 - also report when each message is preloaded
- Sources
Tool Development
In order to facilitate the usage of segments of the framework, we provide a header file in local/minisim.h. This header file will provide initialization routines of many of the global variables which sections of the framework rely on, but it will only initialize those which you explicitly request to be enabled.
"Mini-sim" currently provides support for:
- TK_ENABLE_CONFIG
provides config, the
global instance of Config.
If TK_ENABLE_CONFIG is defined to an empty value, configuration will be read from tekkotsu.cfg in the current directory. Otherwise, configuration will be read from the file specified by TK_ENABLE_CONFIG itself. config is required by many parts of the framework, so unless you are working with a very limited aspect of the the framework, it's probably best to enable it.
- TK_ENABLE_EROUTER
provides erouter,
the global instance of EventRouter.
The event router is needed for any event passing, so if you intend to cause any events to be posted, you will need to enable erouter.
- TK_ENABLE_WIRELESS
will provide wireless,
the global instance of Wireless,
and will spawn a thread for maintaining the network communications.
Only the TekkotsuMon behaviors make direct use of the wireless networking, often you can avoid enabling this unless you want to make use of Tekkotsu's own networking interface. - TK_ENABLE_SOUTSERR
will provide sout and serr, the framework's output
and error console Sockets.
These are used by various aspects of the framework to report warnings and errors, but you do not need to enable wireless to use them! If they are unconnected, text sent to these sockets will be forwarded on to stdout, and if wireless is disabled, this simply means nothing will ever connect to them.
- TK_ENABLE_KINEMATICS
will provide kine, the
global instance of Kinematics,
depends on config!
A number of provided behaviors make use of the kinematics package through use of the Posture motion command, but if you do not intend to use these behaviors, or any other motion commands which may use Kinematics, then you do not need to enable this.
- TK_ENABLE_THREADING will provide initialization of the IPC/Thread.h class, if you want to use it.
Thus, to make use of minisim's initialization routines, you would do something like this:
#define TK_ENABLE_SOUTSERR
// these five are only needed for specific applications
//#define TK_ENABLE_CONFIG
//#define TK_ENABLE_EROUTER
//#define TK_ENABLE_WIRELESS
//#define TK_ENABLE_KINEMATICS
//#define TK_ENABLE_THREADING
//define the sections to enable *before* including minisim
#include "local/minisim.h"
#include <iostream>
#include <string>
using namespace std;
int main(int argc, char** argv) {
//call the minisim initialization function
//to set up the sections you enabled
minisim::initialize();
cout << "Hello World!" << endl;
sout->printf("sout says hi too!\n");
//call the minisim teardown function to free up those globals
minisim::destruct();
return 0;
}
In order to link against libtekkotsu, you will need to have previously compiled the framework. Go to the Tekkotsu directory and type 'make' if you haven't already.
Then, to compile and link your executable, use the -I flag to the compiler to specify that TEKKOTSU_ROOT should be searched for header files, and pass libtekkotsu.a to the linker so that the executable can be produced:
-L${TEKKOTSU_ROOT}/build/PLATFORM_LOCAL/TGT_ERS7 -ltekkotsu -o tk_hello
$ ./tk_hello
Hello World!
sout says hi too!
Alternatively, you may prefer to use a Makefile to automate the build process. We provide a convenient template Makefile for tools in tools/tool_makefile. It is set up to do everything automatically, with the assumption that each tool has its own separate directory.
~$ cd helloworld
~/helloworld$ cp $TEKKOTSU_ROOT/tools/tool_makefile Makefile
Generating main.d...
Compiling main.cc...
Linking helloworld-ERS7...
sout says hi too!
~/helloworld$